In this series of blogs, we’ll showcase Azure technologies and patterns by designing and building a simple home inventory application, which will show details about homes and their locations.
Series 1
In this first post, we’re going to explore how to build our first microservice. This will serve as a core microservice that will implement the Backend For Frontend (BFF) pattern with React as the front end connecting to its own internal Spring Boot back end.
In later series, we’ll expand our application by building additional microservices that follow other industry practiced cloud patterns.
Backend For Frontends (BFF)
BFF oriented applications are backend APIs built specifically for frontend applications to consume. You might be thinking – can’t the frontend app retrieve its own data and parse the response tailored to its requirements? The answer is – it depends.
Think about factors such as:
- How the architecture is setup – for example, in teams where there are many connections between many microservices (M:N relationships), when a change is introduced for a backend API, this could affect logic with every other API and/or frontend that consumes data from that change, which can lead to bugs or worse, cascading errors.
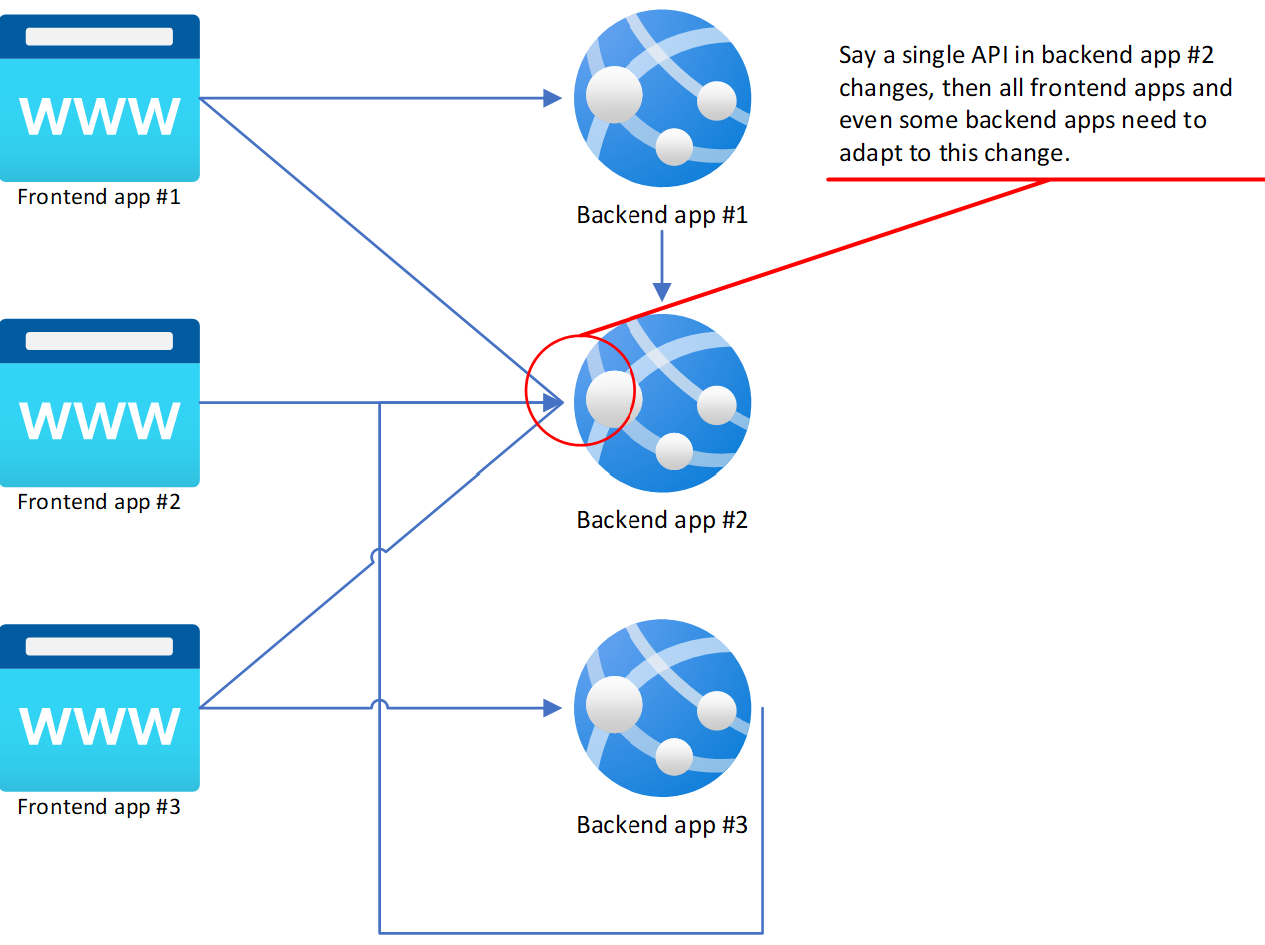
- Compartmentalization of responsibilities – when teams start their journey on building their microservice architecture, backend APIs should be focused on performance (being able to handle load) and extendability (being used by many services) without the need to customize every detail for all its clients. Therefore, BFF-based applications allow backend apps to focus on providing data without needing to tailor to every consumer.
However, there are other valid cases where teams don’t need to have a dedicated backend API for each frontend app:
- Over bloated services – when teams that don’t have that many microservices and they don’t expect to have many in their domain for the foreseeable future, it might be smart to start small and refactor later if it ever needs to be expanded (start small, refactor later).
- Keep It Super Simple (KISS) – some development teams might want to keep things simple to avoid confusion. With a BFF pattern, more layers of processing are being added to your total system architecture, which can make it difficult to troubleshoot bugs (if/when they arise).
For more information on the BFF pattern, take a look at Microsoft’s document on the topic.
Example – Home Inventory App
In this tutorial, we’re building a simple BFF application with a React frontend and Spring Boot backend with Webflux integrated into a single repository project setup.
A quick note, since this project demonstrates the combination of frontend and backend, ${project_root} will represent the base directory of the project.
Backend setup
First, you can either start in the backend or front end – I usually start from the back and work my way towards the front since I can start using the resources without creating mocks.
A few things to keep in mind for the backend:
- Maven will be used as the backend build tool.
- You can use Gradle too, just make sure you setup the correct plugins and executions.
- This project will use Spring Boot version 3.0.0
- As such, Spring Boot 3.0 requires the JDK to be at least v17, so make sure your environment is configured to use JDK17.
- This project will incorporate reactive flows – Reactive based application tend to be more confusing to implement but offer better performance efficiencies.
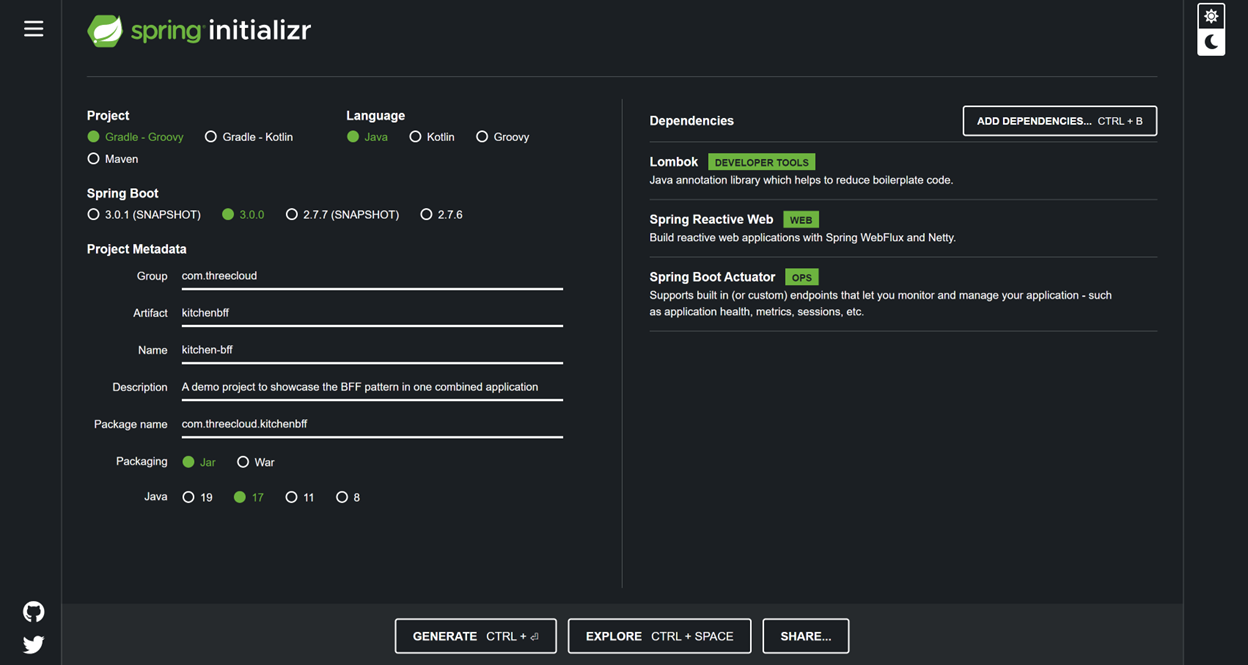
To start, create a new project. I usually prefer using Spring Initializr since it offers a nice GUI to generate projects.
Here are the settings that I used to generate a project:
- Project: Maven
- Language: Java
- Spring Boot: 3.0.0
- Packaging: Jar
- Java: 17
- Dependencies:
- Spring Reactive Web.
As mentioned, this project will be reactive based by making the application more efficient in processing requests in the backend.
- Lombok: I like using less boilerplate code throughout my project, but if you prefer to write things out (like getters/setters, constrcutors, etc.), feel free to exclude this.
- Spring Actuator: This helps reveal actuator endpoints to support the project. This isn’t needed, but is nice to have, and I like using it with my IntelliJ Ultimate where the actuator tab shows what endpoints are available when my application is running.
For group, artifact, name and description, feel free to input whatever you want.
Additionally, you need to install and configure the Maven Frontend Plugin by choosing your version and adding the plugin into your pom.xml file. Note, if you’re using Gradle, try looking at the frontend-gradle-plugin from Siouan, which should do the same thing, just make sure to consult their docs on how to configure your application.
The main idea by adding this plugin to your pom.xml is so you can build, test and compile your frontend app when you build, test and package/run your backend app at the same time (and with less commands). This lets Maven do all the work. You could in thoery, let your devops pipeline manage these changes, but by letting Maven do all the work, this helps the developer’s experience by allowing the dev to focus more on writing business logic rather than moving files around locally to make it all run correcty, which is prone to error.
To add the plugin:
- In your xml, under the build and plugins section, add the plugin in its own <plugin> tags (there should already be one from the org.springframework.boot:spring-boot-maven-plugin plugin for Lombok but add it after that).
- Additionally, you can configure the plugin with additional configs, see here for full list, but I usually add the Working Directory config since its a directory path within the project the builds consistancy between environments and host machines should be the same anyways. I’ll point the working directory to frontend since I’ll be creating a new directory in the project repo that will hold the files for the frontend.
- Next, you must configure the plugins execution steps. For this demo, I’m going to execute three steps: installing node and npm, using npm to install my dependencies, and running the npm build task, which will be created along the frontend – more to come on that later.
For more details under the hood, you should see here for a rundown on the Maven lifecycles. It’ll describe the order that phases and goals will be executed. TLDR – we need these execution steps to be run in order before the maven runs package or install so that the frontend files are loaded. - You should have the plugin setup like below:
<plugin>
<groupId>com.github.eirslett</groupId>
<artifactId>frontend-maven-plugin</artifactId>
<version>1.12.1</version>
<configuration>
<workingDirectory>frontend</workingDirectory>
</configuration>
<executions>
<!--Install NPM and node tools-->
<execution>
<id>install node and npm</id>
<goals>
<goal>install-node-and-npm</goal>
</goals>
<configuration>
<nodeVersion>v16.16.0</nodeVersion>
</configuration>
</execution>
<!--Use NPM to install frontend dependencies-->
<execution>
<id>npm install</id>
<goals>
<goal>npm</goal>
</goals>
<phase>install</phase>
</execution>
<!--Use NPM to build the frontend-->
<execution>
<id>npm run build</id>
<goals>
<goal>npm</goal>
</goals>
<configuration>
<arguments>run build</arguments>
</configuration>
</execution>
</executions>
</plugin>
Frontend setup
Now that we have the backend project configured, the Maven executions goals will not work since the frontend working directory, that we described in the frontend-maven-plugin config, does not exist yet. So, let’s create one now:
- First, initialize the frontend dir within the ${project_root}. This is where we’ll place all files pertaining to the frontend.
- In the terminal, navigate to the root directory of the Maven project and run the command: npx create-react-project frontend. A few notes:
- You need to have npx command installed, see here. If you don’t have npm installed, get it installed or use which ever package manager you want.
- Since the npx command creates another repo, you can delete the git related folders and files since the parent will hold that information. Within the /${project_root}/frontend/ directory, delete the .git directory, .gitignore.
- If you don’t use git as your repo tool, ignore this step but make sure you update your .gitignore file in the ${project_root} directory to include Java and React files. A good tool to use is io where you can simply enter technology keywords to generate common files to ignore with that keyword, so typing in java and react is a good first start.
- In the terminal, navigate to the root directory of the Maven project and run the command: npx create-react-project frontend. A few notes:
- For the front end, we’re going to be using Babel and Webpack to compile our frontend project.
- For the Babel configuration, add the dev dependencies to your json:
"@babel/core": "^7.20.5",
"@babel/preset-env": "^7.20.2",
"babel-loader": "^9.1.0",
- For Babel, we’ll leverage the base and react presets, these will autoconfigure environment properties for us to compile our Javascript code to ES2015+ syntax. Create a `babel.config.json` file in your `${project_root}/frontend/` directory and the following presets, like so:
{
"presets": [
"@babel/preset-env",
"@babel/preset-react"
]
}
- For the Webpack configuration, add the following dev dependencies to your json file:
"html-webpack-plugin": "^5.5.0",
"webpack": "5.75.0",
"webpack-cli": "^5.0.1",
"webpack-dev-server": "4.11.0"
Note the html-webpack-plugin, this is optional, but I used it so that I can compile my index.html file with the proper files.
- create a new Javascript file called config.js and add the following information:
var path = require("path")
const HtmlWebpackPlugin = require('html-webpack-plugin')
const PATHS = {
build: path.join(
__dirname,
"..",
"src",
"main",
"resources",
"static"
)
}
module.exports = {
entry: path.join(__dirname, "src", "index.js"),
mode: "development",
output: {
path: PATHS.build,
filename: "index.js",
clean: true
},
resolve: {
extensions: ["*", ".js", ".jsx", ".ts", ".tsx", ".json", ".css", ".scss"],
modules: [path.resolve(__dirname, "src"), "node_modules"]
},
module: {
rules: [
{
test: /\.m?js$/,
exclude: /node_modules/,
use: {
loader: "babel-loader",
options: {
presets: ['@babel/preset-env']
}
}
},
{
test: /\.css$/,
use: ['style-loader', 'css-loader']
},
{
test: /\.(jpg|jpeg|png|gif|mp3|svg)$/,
type: "asset/resource"
}
]
},
plugins: [
new HtmlWebpackPlugin({
title:
"Test",
template: path.join(__dirname, "src", "index.html")
}),
]
}
- Now that we have Babel and Webpack configured, the next step is to update our json file to change the build step. We’re going to use the webpack command instead. So, in the scripts object, for build, change it to webpack. In the case of production builds, make sure to add the –mode production flag to the webpack command to package the node modules, if you’re running everything locally, it should be ok.
"scripts": {
"start": "react-scripts start",
"build": "webpack",
"test": "react-scripts test",
"eject": "react-scripts eject"
},
Adding business logic
Up until this point, we were able to configure a backend Maven project that uses Spring Boot and a frontend app in React into one application. However, the app doesn’t do anything yet.
We still need to:
– build a frontend to display the data
– build a backend API to produce the data
– connect the frontend to consume the backend
Display the front end
Since this is a Spring Boot application, the React frontend needs to be compiled first and then loaded into the resources directory so that the Spring Boot app can serve the content. To start manually, you need to open a terminal in the /frontend dir. From there, the package.json file that we modified earlier has a command that uses Webpack (and Babel) to compile and condense our frontend code into a single file by running npm build. Now if you remember, the webpack.config.js file contains information on how and where the compiled files should be outputed – in our example, we outputed to: __dirname/../src/main/resources/static.
So now that the files are loaded into the resources directory, Spring Boot still needs to know how to serve files from that location. To accomplish this, I created a Spring config class (RouterHandler.java) under a config directory, and it leverages Spring’s router functions to find the front end content:
@Configuration
public class RouterHandler {
/**
* Makes all resources in the /resources/static directory available. Without the wildcard, the app wouldn't know that the index.html file references the index.js file that was minifed by Webpack.
* Be cautious when adding files to this directory, as anything in this directory is served to the web.
*/
@Bean
@Order(1)
public RouterFunction<ServerResponse> makeStaticAvailable(
) {
return RouterFunctions
.resources("/**", new ClassPathResource("/static/"));
}
/**
* @param html - the static content to serve
*
* I created two routes when users go to "/" and "/home", they should be redirected to opening the index.html file.
*/
@Bean
@Order(2)
public RouterFunction<ServerResponse> redirectRoot(
@Value("classpath:/static/index.html") Resource html
) {
return route(
RequestPredicates.GET("/"),
request -> ServerResponse
.ok()
.contentType(MediaType.TEXT_HTML)
.bodyValue(html)
.cache(Duration.ofNanos(0)))
.and(
route(
RequestPredicates.GET("/home"),
request -> ServerResponse
.ok()
.contentType(MediaType.TEXT_HTML)
.bodyValue(html)
.cache(Duration.ofNanos(0)))
);
}
}
Backend API
To start, let’s create an API that returns home information.
- Create a directory in the ${project_root}/src/main/java/<package>/controller where is the group or artifact name you chose earlier.
- Then create a controller class, called class and populate the class with the following:
@Controller
@RequestMapping("/api/v1")
@CrossOrigin
public class HomeInventoryController {
@GetMapping("/houses/1")
public Mono<HouseDTO> getHouses() {
return Mono.just(new HouseDTO("111 Main St.", "Cincinnati", "Ohio"));
}
}
- For the response, the app is expecting to return a class object. Place this under the ${project_root}/src/main/java/<package>/model/dto package (create one if you haven’t already).
@Data
@AllArgsConstructor
@NoArgsConstructor
public class HouseDTO implements Serializable {
private static final long serialVersionUID = 9205788174730279956L;
private String name;
private String city;
private String state;
}
- Lastly, here is my properties:
spring.application.name=home-inventory-bff
server.port=8080
spring.main.web-application-type=REACTIVE
We now have an API endpoint that returns a single kitchen detail (/api/v1/homes/1). In future blogs, we’ll upgrade the backend to be more organized, have more APIs and use data from other sources (rather than mocking data).
Frontend – consuming the backend API
Next, let’s setup our React project to read this backend data and display it to the frontend.
- First, in my json file, I am using the dependencies below:
"react": "^18.2.0",
"react-dom": "^18.2.0",
"react-router-dom": "^6.4.2",
"react-scripts": "5.0.1",
The react router is the key library that will allow us to serve pages from the react-router-dom instead of going to the backend server.
- Next, I’m going to show the js component, which will be the main component to make the call to the backend:
const [house, setHouse] = useState({});
useEffect(()=> {
console.log(`Fecthing data`);
fetch(`http://localhost:8080/api/v1/houses/1`)
.then((response) => response.json())
.then((data) => setHouse(data))
;
}, []);
return (
<>
<div className="base">
Welcome to the rental dashboard!
</div>
<div className="house-details">
<h4>Information about the homes: </h4>
<p>Name: {house.name ? house.name : "Loading"}</p>
<p>City: {house.city ? house.city : "Loading"}</p>
<p>State: {house.state ? house.state : "Loading"}</p>
</div>
</>
);
The useState() method will store state information. The useEffect() method will be executed when the page loads up, which makes a call to the backend. Notice the fetch() method, it points to http://localhost:8080/api/v1/houses/1, which was the API we created in the backend earlier. We’re then storing that json response (HouseDTO) in the state and rendering it in the body.
Demo
At this point, all the pieces have been made for a BFF application. We need to compile and load the frontend Webpack files to the backend and start the app. If you’re using IntelliJ, you can also setup your Spring Boot application run to include a npm build command in your /frontend dir, which can run everytime you run the backend app.
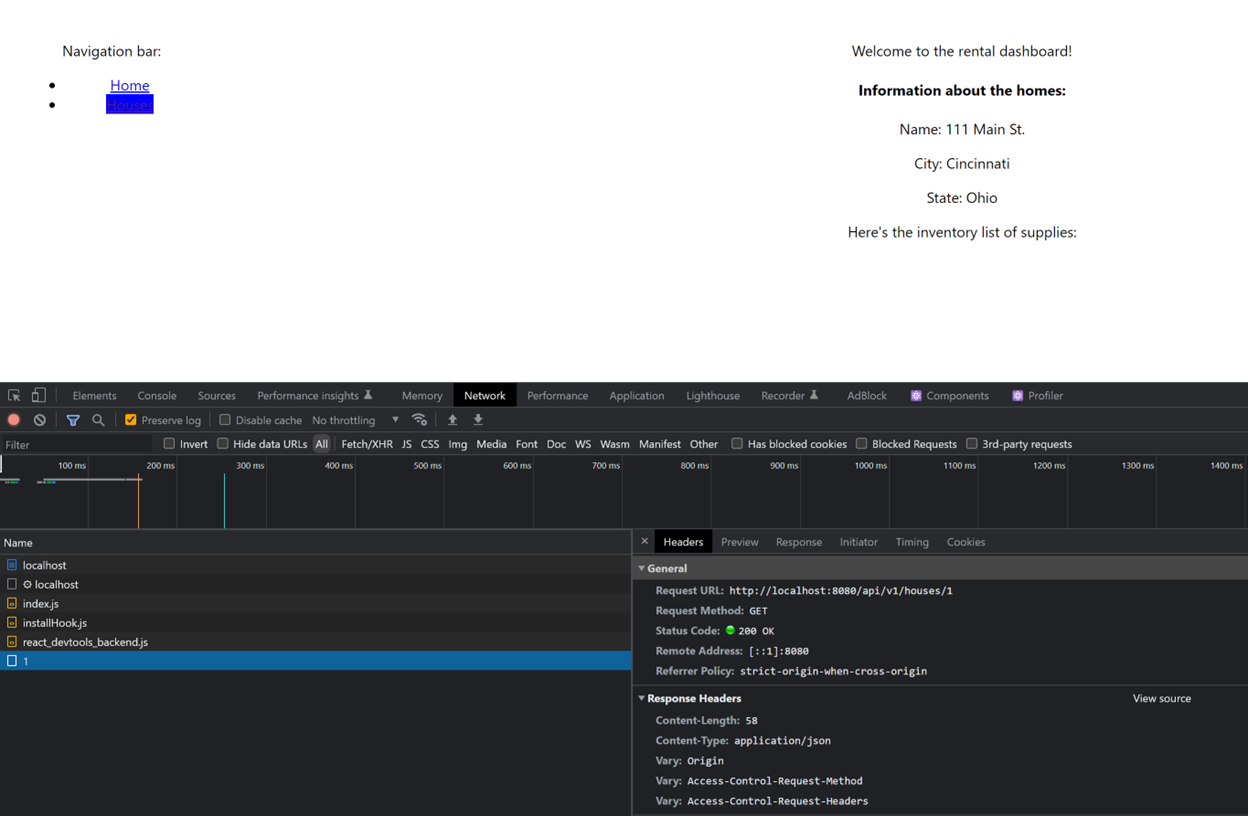
Once your application is up and running, head to the endpoint http://localhost:8080/.
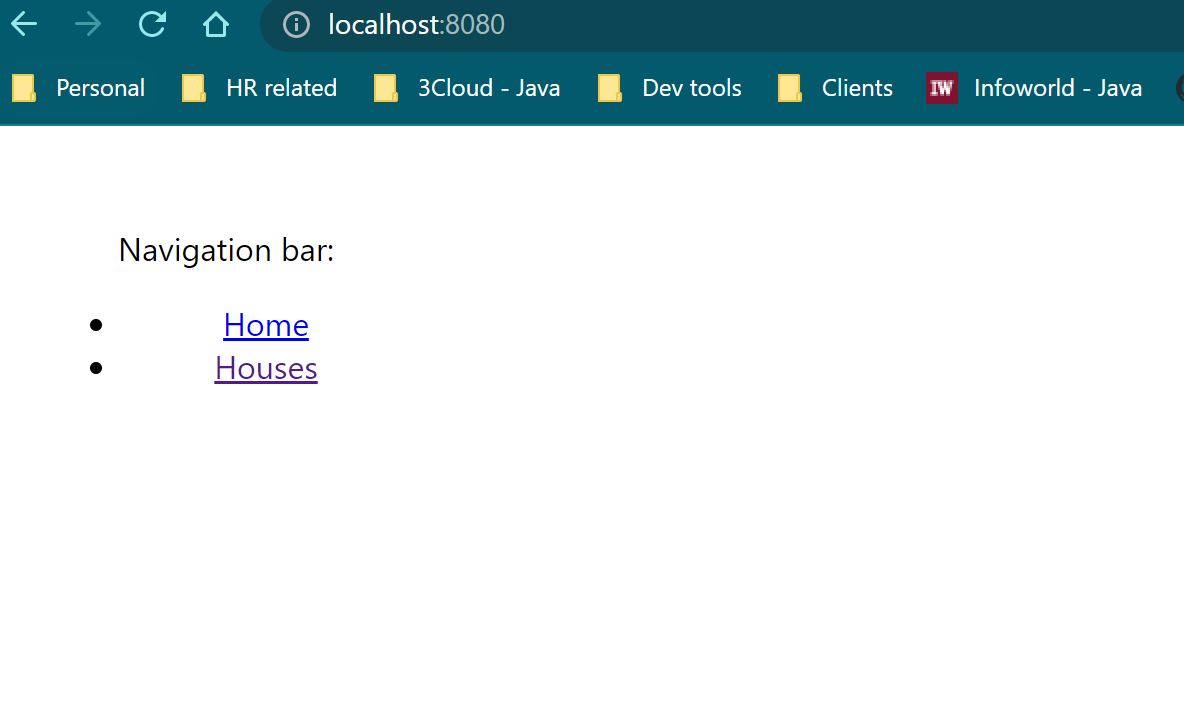
From there, click on the navigation sidebar on the left for Houses. Voila! You should see a simple page load up with information about the name, city and state of the homes. If you have your web developer tools open, you can also see the react portion made a request to it’s Spring Boot backend to retrieve house ID 1.
Final notes
By now, you should be able to setup and configure a BFF application using React and Spring Boot.
A known issue with the current build is by going directly to an endpoint, say /houses, then you will receive a 404 error. This is because the react-router-dom doesn’t know what to do with this endpoint. Instead, it needs to start from the /home or / endpoint since it will render the proper components as the user navigates through the app.
Github code
Please visit the 3 Cloud ASD-OSS blog series to view the code base.
Additional series
Please checkout part 2 in this series as we build out a home inventory platform utilizing Azure Redis for session management.