Microsoft’s cloud-based, scalable Azure Machine Learning (ML) service speeds development and deployment of data science projects. In this demo, we’ll use the Azure Machine Learning SDK for Python to train a simple machine learning model and deploy it to the cloud service to then get predictions from our model.
Before beginning, you’ll need an Azure subscription (create one free here). Then you’ll need to create an Azure Machine Learning service workspace resource in your tenant. Once you spin up the workspace, you will also need to create a Notebook VM, then open a Jupyter notebook to code in. Each of the code segments below are blocks of code inside of the notebook I created for this demo.
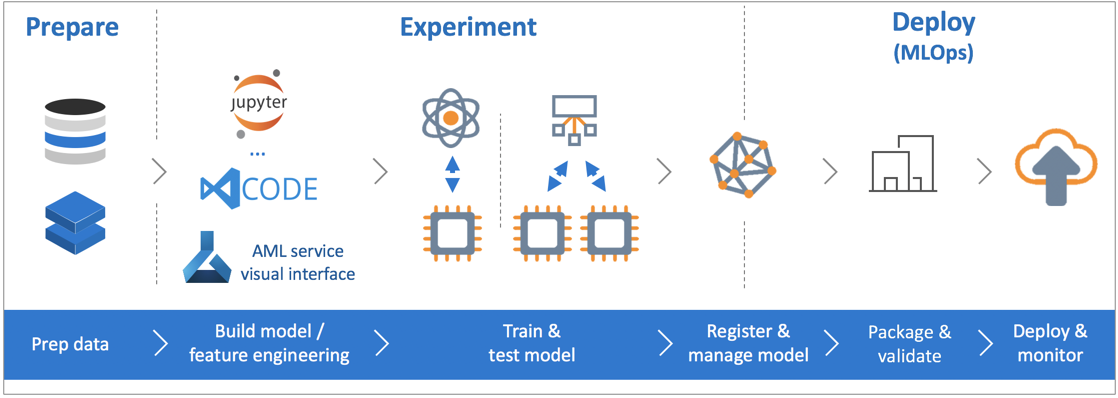
We will cover three major sections in our walkthrough: 1) setting up the development environment, 2) training the predictive model, and 3) deploying the model as an Azure ML service – each step has several sub-steps.
Set Up the Development Environment
We’ll begin by setting up our environment and getting it ready to train an experiment. There are five essential steps to getting our environment ready for an experiment:
- Initialize the Workspace
- Initialize an Experiment
- Create a Datastore
- Create or Attach a Compute Resource
- Environment Set Up
Initialize the Workspace
This step imports the base Azure ML packages into our Python code and connects us to the workspace we created in the Azure portal. The print lines are, of course, just a check to make sure that we’ve imported and are executing the code properly. The important lines of code in this section are the importing of the azureml.core package, which contains all of our SDK functions, and the initializing of the Workspace object.
Initialize an Experiment
Next, we’ll initialize our Experiment. Let’s give it the name that we’ll save it as. Then we’ll create an Experiment object that links the workspace to the experiment for us to use later.
Create a Datastore
In this step, we need to create a folder in our workspace in which to write out our code in some later steps. Any custom Python scripts used in Training or Scoring the Model should be added to this folder after it is created. This is also the folder where we’ll want to write out any file outputs (Training, Scoring, YAML, etc.)
Create or Attach a Compute Resource
The code below is one of the most basic variations on creating a Compute Cluster that I’ve found in my research. This version creates a cluster using the VM size and Max Node options from the Azure ML Compute Cluster interface. This section of code is expandable beyond what we’re showing here and is where much of Azure ML service’s scalability is based. You can choose from dozens of options in the Azure Cloud to spin up various types of clusters. These clusters also come preloaded with your environment, whether it’s Anaconda, Spark, or TensorFlow, to name a few. You will need to add any packages that aren’t preloaded into the environments, which may take a little trial and error, but you won’t need to create a Python Environment from scratch.
Once this code completes, a Compute Cluster will appear under the Compute section in the AzureML Workspace resource in the Azure Portal.
Environment Set Up
In this step, we need to import our Environment package from the azureml.core, if we haven’t already done so. We must also initialize the Environment object for later steps. If you’re not adding any packages that aren’t preinstalled on the Compute Cluster, you can skip the “adding packages” steps. I would, however, advise leaving in the step that saves the YAML file to your workspace, as you may need it for later deployments. Also, be aware that some packages are not registered with Anaconda and may need to be loaded from PIP (the package installer for Python), or some other resource. I’ve added a Conda and a PIP example in the code below (conda installs and manages packages from the Anaconda repository.)
Train the Model
This section describes the three steps involved in training and executing an experiment in the Azure ML Service:
- Create the Training Script
- Submit the Training Job to the Compute Cluster
- Register the Model
Create the Training Script
The training script is essentially the guts of the Azure ML Service. Every other section in this post is Azure ML SDK code. This section is based almost entirely on the code you are using to produce your AI model. I recommend writing this section outside of your Azure ML service deployment; doing so allows you to develop and test your code without the overhead of developing the Azure ML service deployment at the same time. That being said, for this code to work inside of the Azure ML service, the last few lines that output the pickle file are mandatory. The pickle file is what is used to register the Model inside of the Azure ML service.
Submit the Training Job to the Compute Cluster
In this step, we’ll create an object to run our script against the Compute Cluster we created earlier. The object needs the script directory and the training script to initialize. We’ll then run configuration functions against the object to set the target Compute Cluster and the Environment we will use in the training. And lastly, we will execute the configured run script job.
When this code section completes, an Experiment will show up in the Azure portal in your Azure ML workspace resource. Also, assuming your Experiment has a pickle file output, that file is created here.
And we can watch the execution of the Training with the following code.
Register the Model
This last step in Training the Model takes the earlier-mentioned pickle file, output in the training script creation and execution, and registers it in the Azure ML service workspace.
Once this code completes, a Model will show up in the Azure portal.
Deploy the Model as an Azure ML Service
This last section describes how to deploy the Model and create a web service that can be used for scoring new data.
- Create the Scoring Script
- Deploy the Azure Container Instance
- Test the Deployed Service
Create the Scoring Script
The scoring script is used to return predictions from your registered model. This script has two mandatory sections and one optional section. The scoring script requires an INIT function and a RUN function to be defined. The INIT function connects the scoring script to the Model we deployed in the previous section. The RUN function executes the predict function from whatever package you used to do your training. For example, in the scikit-learn package the predict function is called predict(). Other packages may use a differently named function to do the same thing. The optional third section defines a schema for the inputs and outputs for scoring. In some software this schema is a requirement. For example, in the webinar we did on this subject, we to connect to the Model and get predictions. Power BI dataflows require creation of a schema. As most other requests to this API will not require the schema, it can be skipped.
Deploy in an Azure Container Instance
Now that we have a trained model and the ability to score data input to the model, we need to wrap the scoring script in a container and deploy the Container as a Service (CaaS) to the Azure ML service. In this example, we’ll deploy the service as an Azure Container Instance (ACI). This first section of code adds some metadata to the container configuration.
And the second section of code creates the Image and deploys it as a service.
When this section completes, the ACI will show up under Images in the Azure ML service user interface, and the web service will appear under Deployments.
Test the Deployed Service
We can test our deployed service, using test data in JSON format, to make sure the web service returns a result.
Additional Resources
Think of this tutorial as a basic framework; a starting point to developing your own Azure Machine Learning deployments tailored to your company’s needs. We also have a couple of other blog posts at 3Cloud that add to what we’ve discussed here.
And be sure to also explore this blog post, by our Senior Consultant David Eldersveld, a Microsoft MVP, on using Azure ML deployments in a Power BI Dataflow.
David’s post makes use of both Azure’s Cognitive Services and Machine Learning.
The code in this post was developed using the sample code included in the Azure ML service and the Microsoft Recommenders GitHub repository: https://github.com/microsoft/recommenders
And you can find copies of the Jupyter notebooks I used to create this post and the webinar demo here: https://github.com/datascinerd/AzureML-Examples
Want to find out more about how Azure ML can fit into your advanced analytics strategy? Contact us today to learn more.