Power BI Deployment Pipelines are a strategic feature that allows users to better manage content across their organizations. By leveraging this powerful tool, users can simplify the deployment process and ensure security of potentially sensitive data. With a quick glance, users can compare content across Development, Test, and Production stages within their environments and the straightforward user interface allows users to quickly pinpoint any differences between stages, as well as identify potential risks. Deployment between stages is as simple as the click of a button and users can either deploy all the available content simultaneously or specify selected content between stages. Each deployment stage can have different parameters, allowing for data isolation and better protection of sensitive information. In this article, we’ll break down the specifics of deployment pipelines, and discuss how you can best leverage this tool within your organization for optimal efficiency.

Prerequisites
To utilize deployment pipelines, you must be a Pro user in a Premium capacity, or you must have a Premium Per User (PPU) license. Further, the workspace must have the new workspace experience, not classic mode. All the workspaces in the pipeline must reside within a capacity, but users can have different capacities for different workspaces in the pipeline. Ultimately, the Production stage requires a Premium Workspace; however, to minimize costs, the Development and Test stages could use Azure A SKU or PBI Embedded instead.
About Pipeline Stages
Creation
Creating a deployment pipeline is a simple process – once you have a workspace in the first stage, Power BI Service creates a copy of that workspace into the next stage. Power BI only copies over the metadata of the content to the next stage, not the data itself. Specifically, Power BI copies over the data sources, parameters, report visuals/pages, and item relationships to the next stage, and then overwrites the content in the next stage. Since only the metadata is copied over to the next stage, you must do a full refresh on the dataset to populate the data itself into the next stage.
There are three stages in the pipeline: Development, Test, and Production, however, you do not have to utilize all three stages. You could select any two stages if needed, allowing for a truly customized experience.
Stage Details
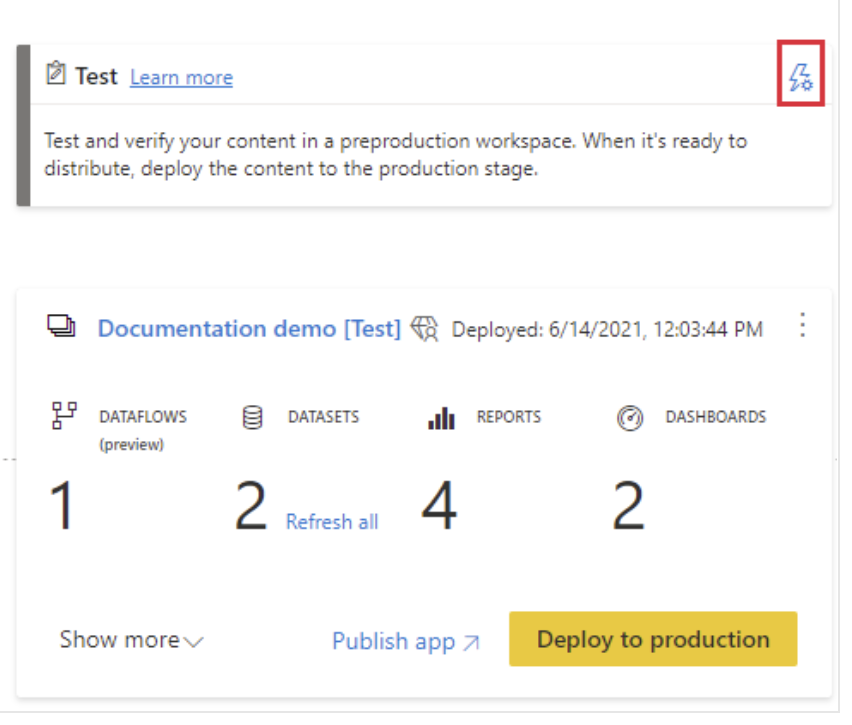
The Development stage is typically used for building and designing new content. Development data is typically a smaller subset of the Production dataset to allow report builders to work quickly without experiencing slow runtimes. The Test stage is for testing the new content created in Development and should target a small audience of quality assurance testers. In Test, users typically load larger amounts of data than in Development. The goal of Test is to troubleshoot the functionality and design of the app and prepare the app for the end users. The Production stage is the final version to share with the business users. Production should hold the full dataset intended for the end users.
It is best practice to configure the workspace access according to the stages of the pipeline. For example, only a small number of users should have access to the Pre-production stages in order to prevent confusion or harmful data exposure.
If you want to manage the historical versions of the PBIX files, you can auto-sync the PBIX files with OneDrive to keep the latest version updated and retrieve previous versions. You should only auto-sync files in the initial Development stage, not Test or Production. If you do auto-sync files in later stages, there will be problems deploying content across the pipeline.
Limitations
There are several factors to consider before creating a deployment pipeline. First, you must be an admin of the workspace before you can assign the workspace to a pipeline. The workspace must also fall under the Premium capacity category. Further, one workspace cannot be assigned to multiple different pipelines – a workspace can only exist in one pipeline. Finally, the following items are unsupported:
- Datasets not stemming from a PBIX
- PUSH datasets
- Streaming dataflows
- Excel Workbooks
- Goals
- Template app workspaces
Update as of December 2021:
Users can now assign existing workspaces to all pipeline stages. After you assign two workspaces, the pipeline automatically compares the content between them and matches the items based on item type and name. Whenever the pipeline finds a match, the item moving from the source stage overrides the content in the target stage. Please note that matching only occurs when you initially assign a workspace. If you want to match items between existing workspaces that already exist in a pipeline, you must unassign one of the workspaces and reassign it to the pipeline to kickstart the matching process.
How to Create a Pipeline
Creating a deployment pipeline is a simple process guided by the handy user interface in Power BI Service.
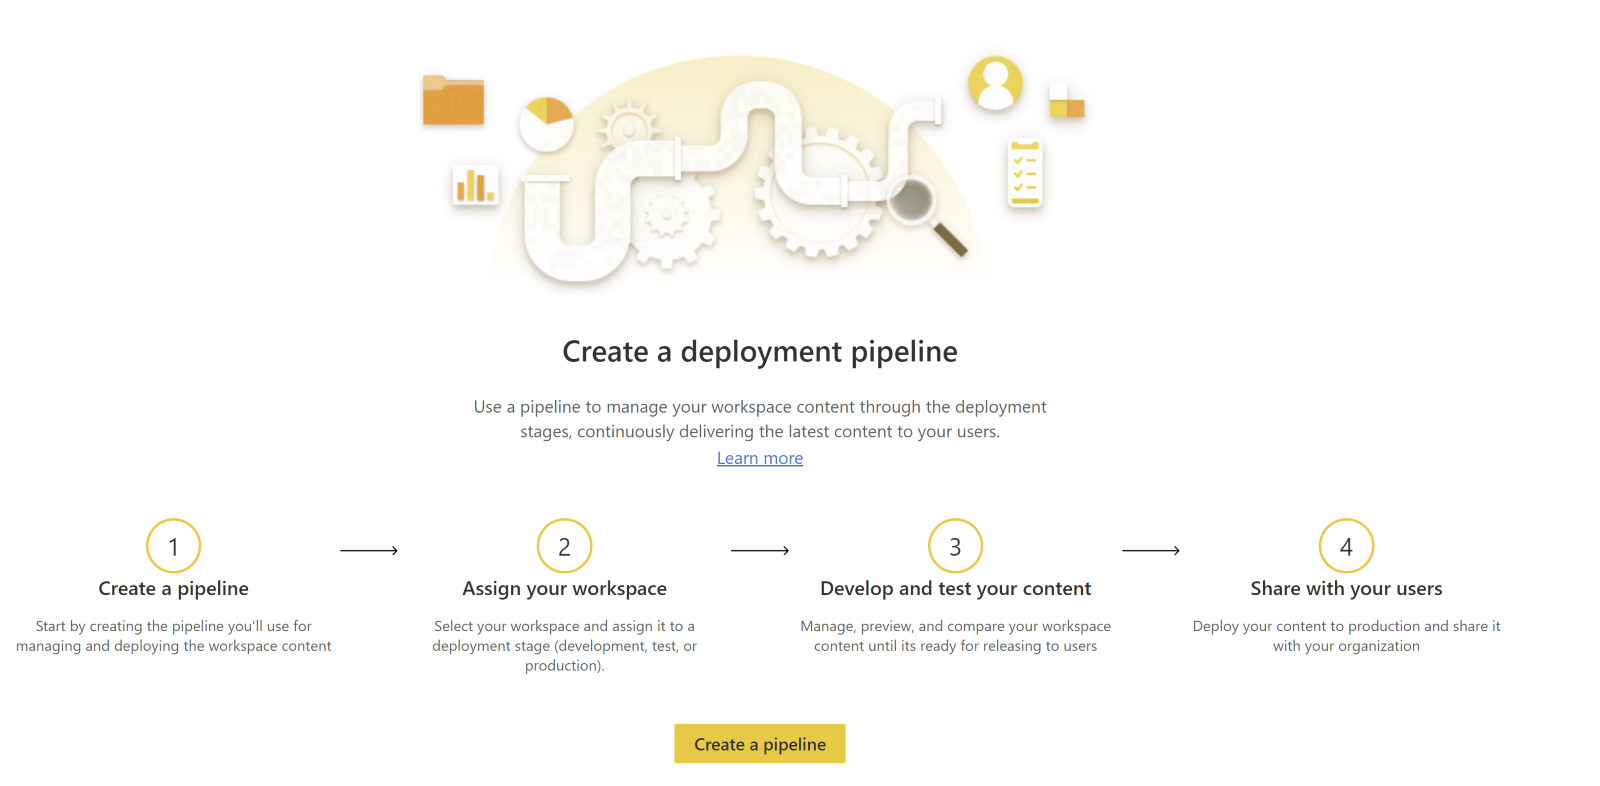
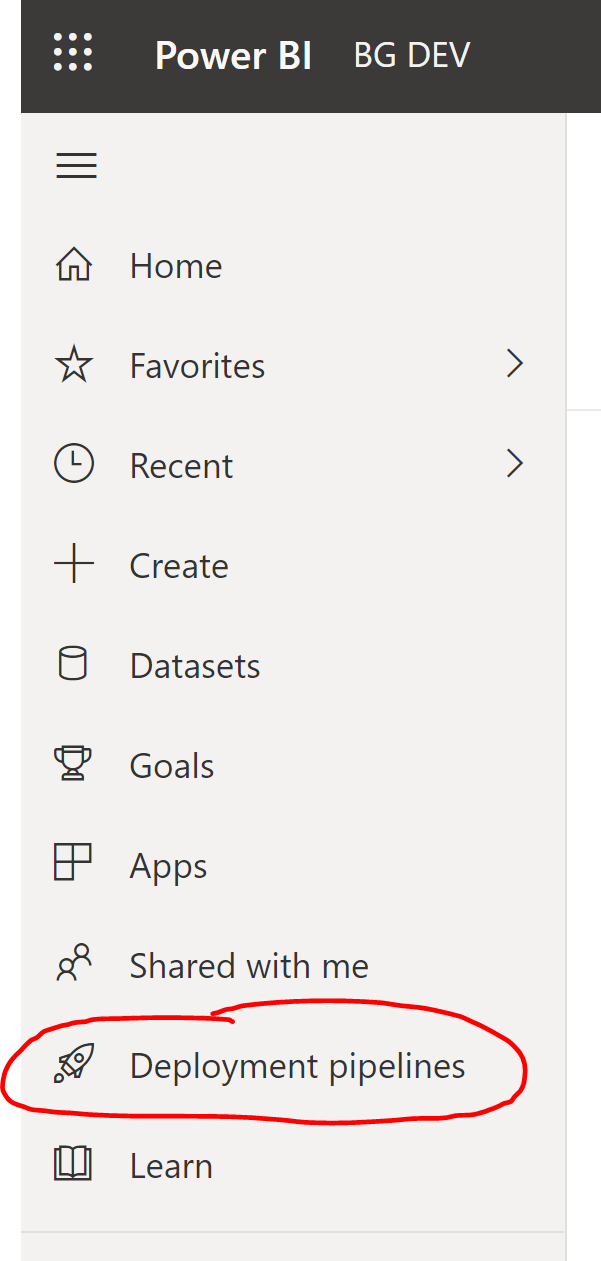
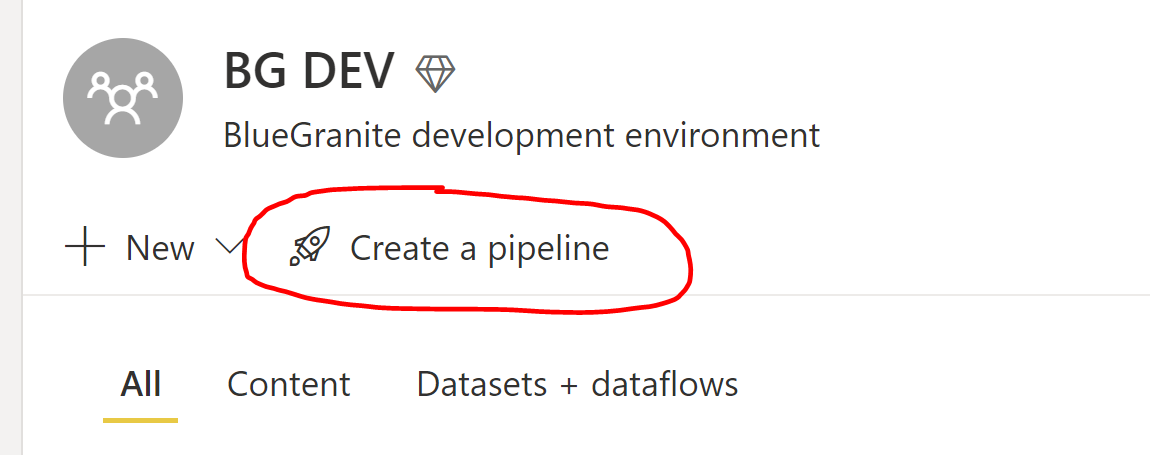
First, open Power BI Service and click Deployment Pipelines on the left side pane. You can also click “Create a Pipeline” underneath the workspace name.
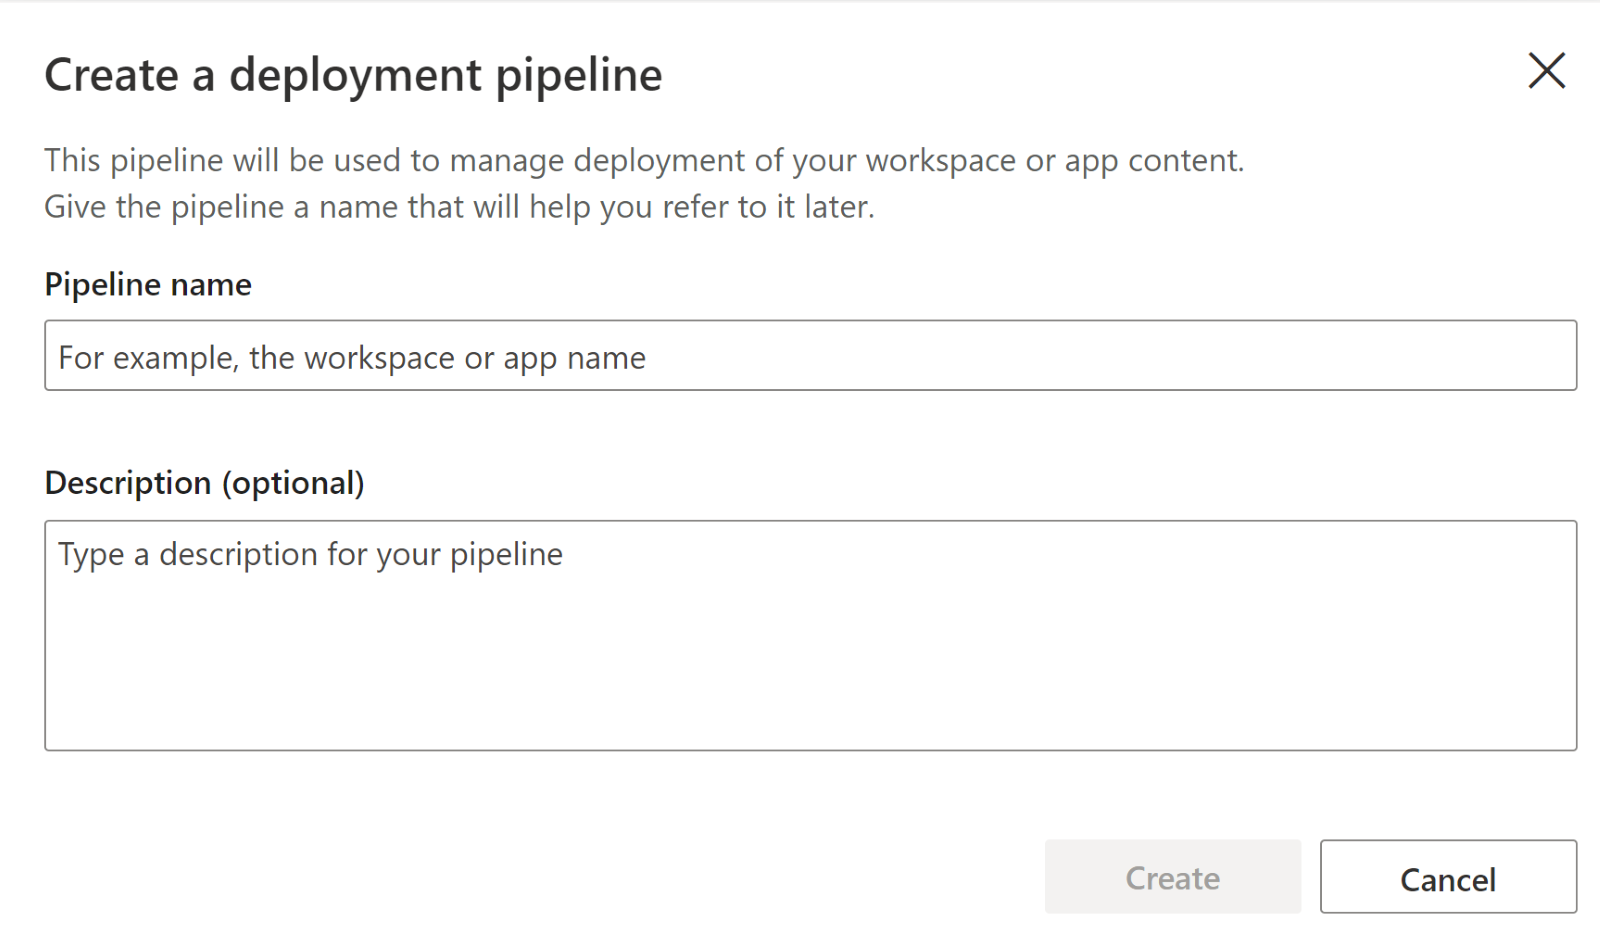
In the next window, give the pipeline a name and optional description and click Create.
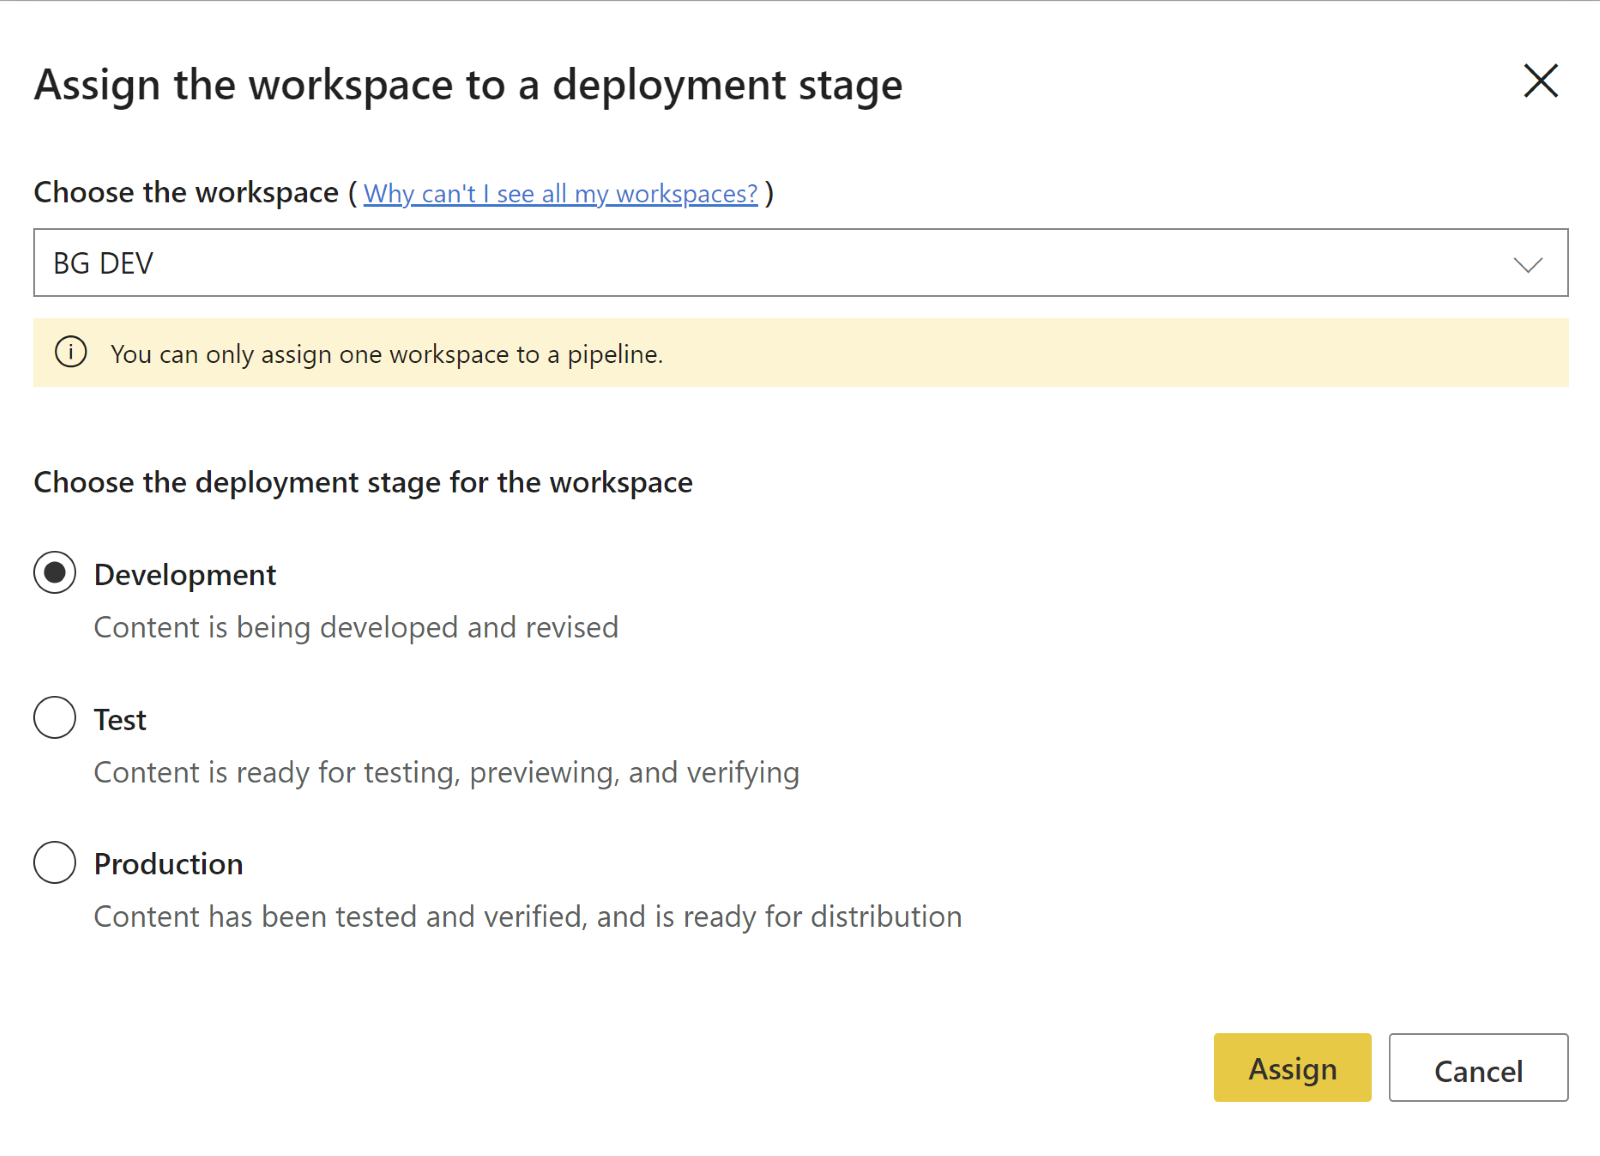
Next, click “Assign a Workspace” to select the workspace from which you want to base your pipeline. Select the stage you want to assign the workspace to. You can select any of the three stages (Development, Test, or Production), then click “Assign”.
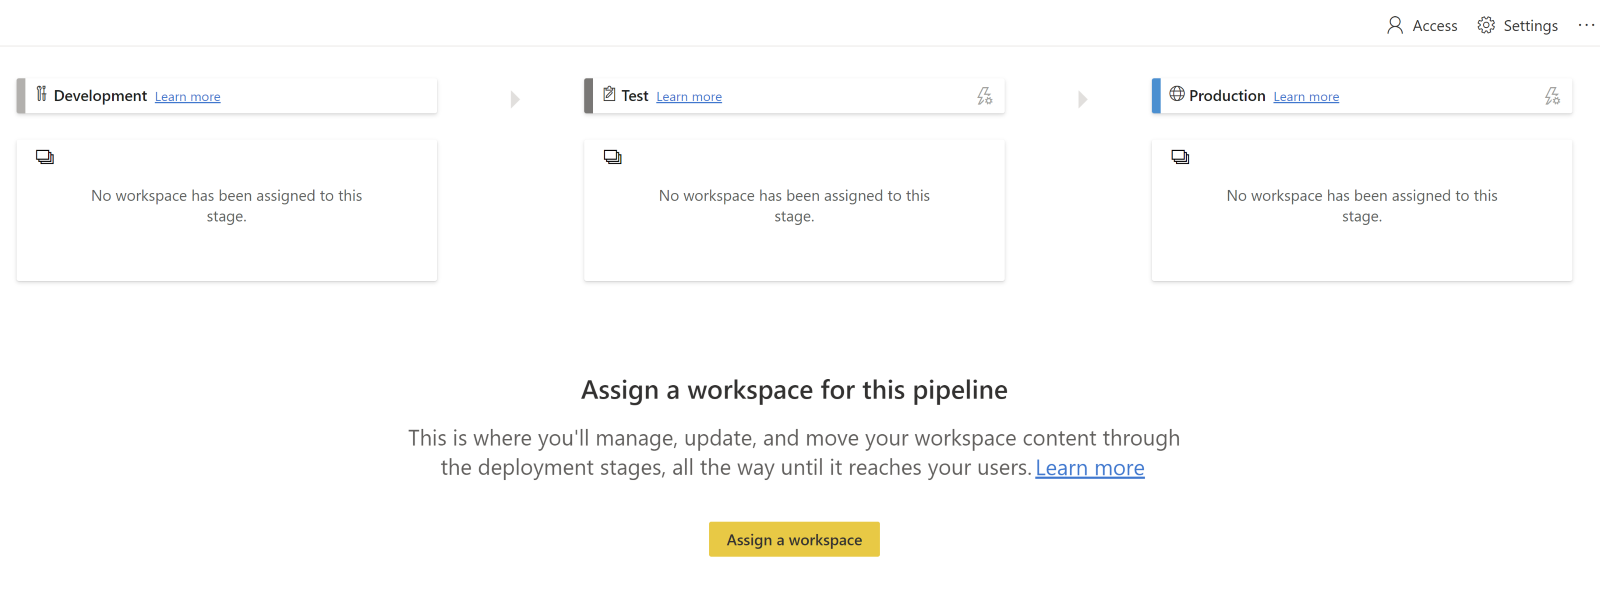
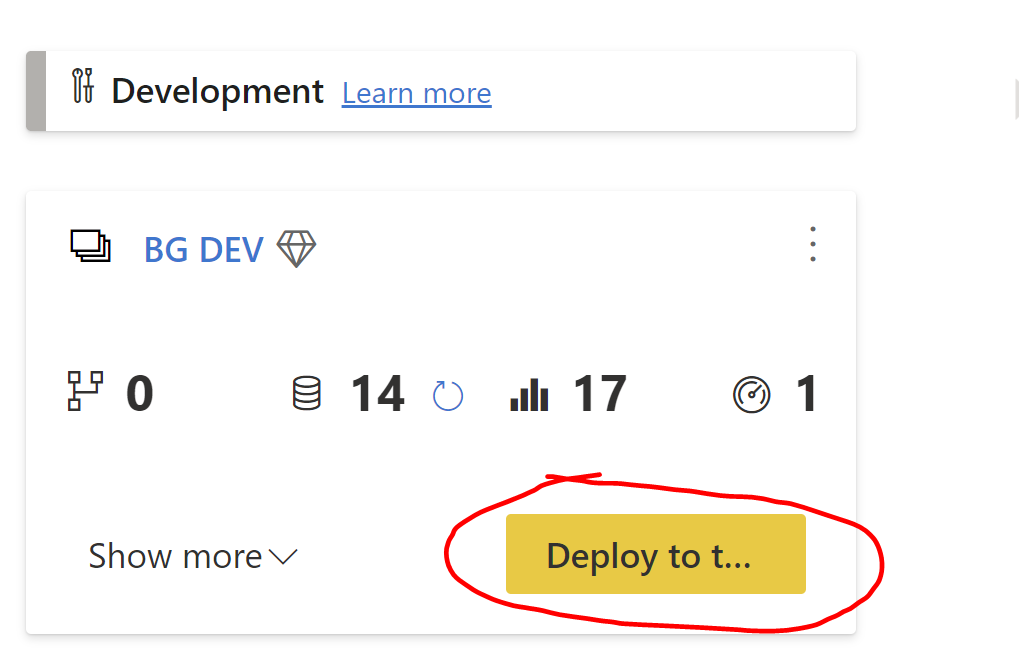
Now you have officially initiated your deployment pipeline. When viewing the deployment pipeline, Click the “Deploy to …” button to deploy to the next stage. Power BI Service creates a duplicate workspace in the next stage that includes all the content in the current stage.
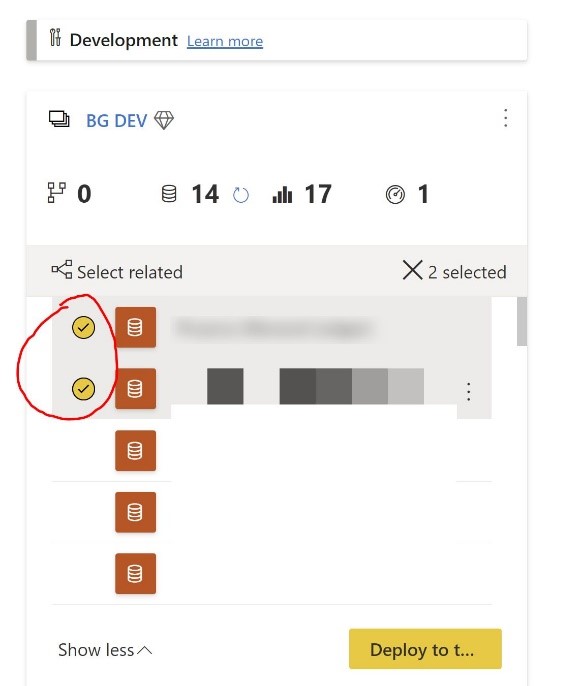
Alternatively, you can select which specific items you want to deploy by clicking “Show More” and checking the circle icon next to those. You can also click “Select Related” to deploy dependent items together, such as a dataset and its corresponding reports.
Notes on Deployment
The items an object is dependent upon must exist in the stage you are deploying to. For example, the underlying dataset must exist in the stage you are deploying to before you can deploy the corresponding report. However, deploying to an empty stage bypasses this issue and is encouraged as a best practice.
When you deploy to the next stage, Power BI automatically names the newly created workspace with the same name as the original workspace with the stage name in brackets (example: Sales Data [Test]). If you want to change the name of the workspace, click the ellipsis icon in the top right corner of the pipeline stage and click Workspace Settings to update the name.
Sensitivity labels are only copied over if you deploy to an empty stage or if a new item is created. To manage sensitivity labels, visit the M65 Compliance Center for an overview of the labels in your organization. To edit the label per item, go to the workspace, select the ellipsis icon next to the workspace name, and select which sensitivity label is applied. Security label maintenance is crucial if your content is being exported out of Power BI, either by using the Analyze in Excel feature, by live Pivot Table connections, or through sharing with external users.
For datasets, items such as roles, refreshes, and data source credentials are not copied over during deployments. You will have to set each property for the dataset in the next stage if needed.
Incremental refreshes and composite models are both supported features with deployment pipelines. To leverage incremental refreshes, first configure the refresh in PBI Desktop and publish the dataset. Once you initially deploy the dataset, the incremental refresh policy is copied alongside it. Upload the PBIX to the Development stage, then deploy the content to the next stages.
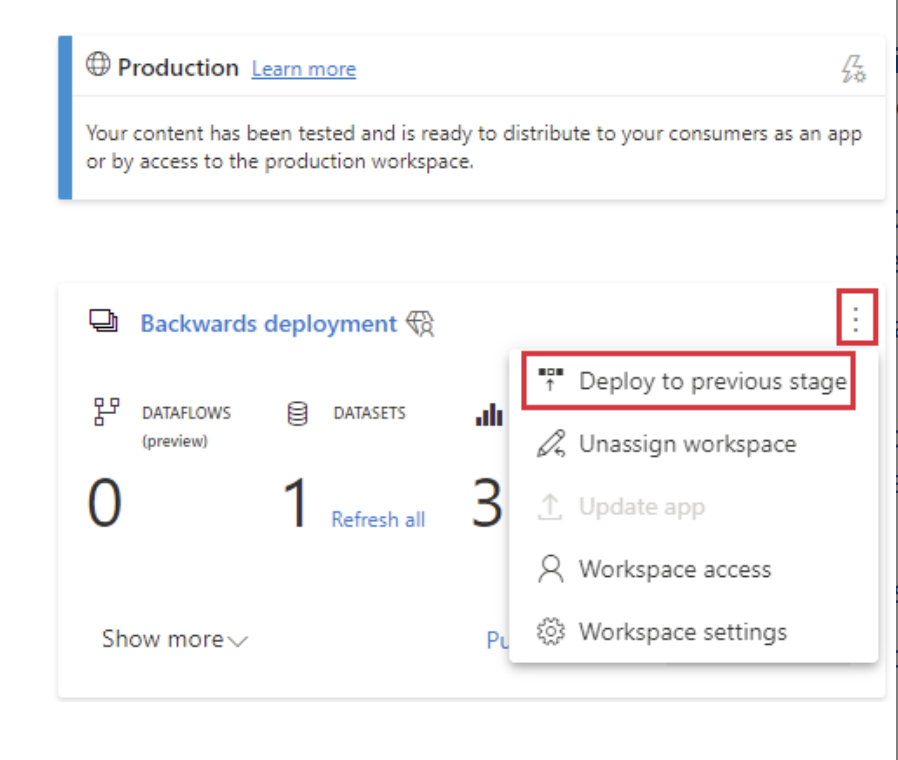
If you are in Test or Production, you can deploy backwards by clicking the ellipsis icon in the top right corner of the pipeline stage and selecting “Deploy to previous stage”. When deploying backwards, the previous stage must be completely empty.
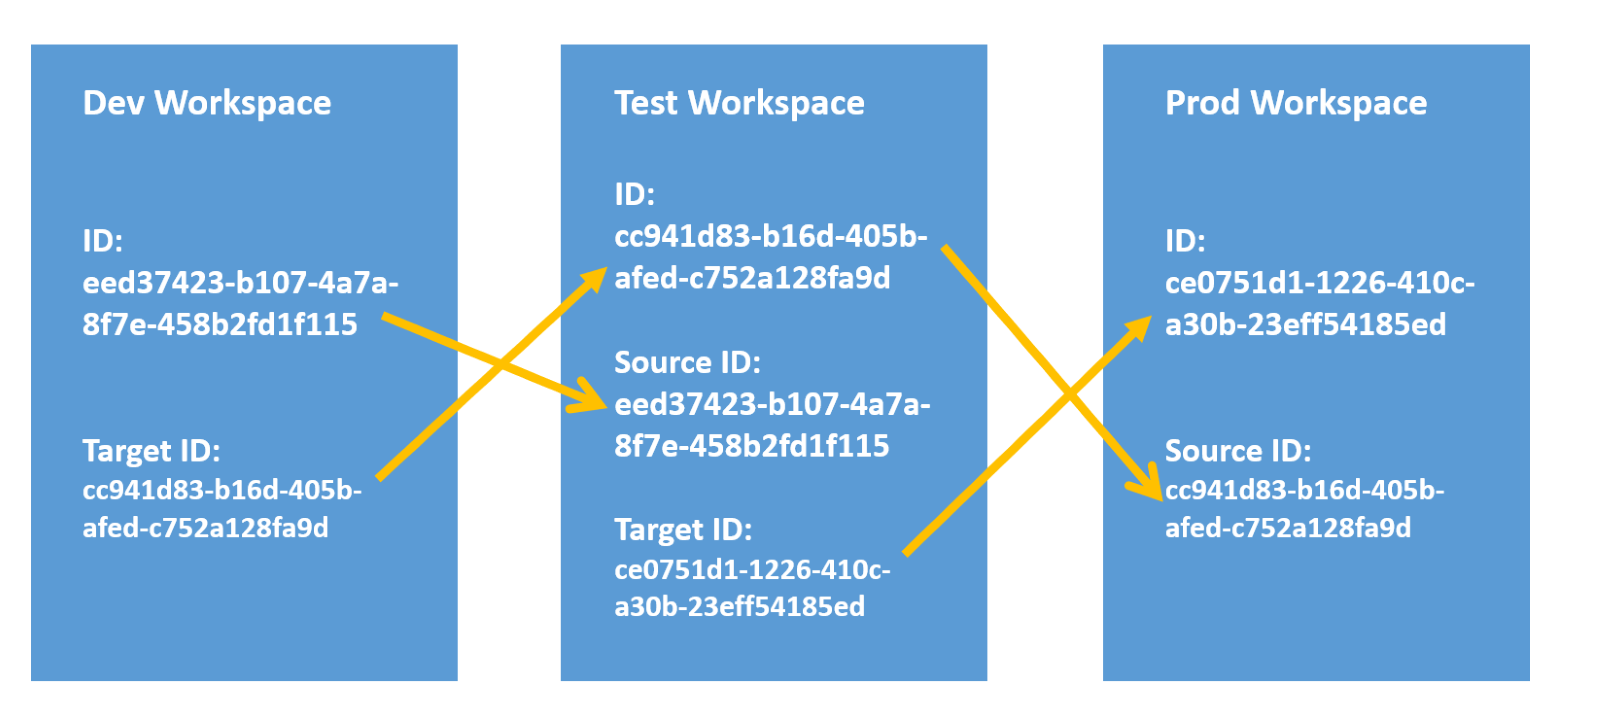
A Warning on Backwards Deployment
Be careful when deploying backwards! The Source and Target Artifact IDs of the workspace change when the initial dataset is published to the workspace and the next pipeline stages are created. As the next stages are created, the Target Artifact ID of the earlier stage needs to match the Artifact ID of the next stage. The Source ID of the latter stage needs to match the Artifact ID of the previous stage. The Source and Target IDs of each dataset need to be in sync between stages, or you will have orphaned datasets in the pipeline. These orphaned datasets have the same name as other datasets, but different IDs. This results in errors when published apps and reports reference the incorrect ID. Further, it creates confusion for users, as two items with the same name will appear in the Deployment Pipeline view.
The bottom line is to ensure that ALL content in the previous stage is removed before deploying backwards.
Deployment Rules
Deployment rules are the most robust feature of deployment pipelines. Different stages can have different settings for databases, servers, or query parameters. For example, Development could refer to a sample of the database, while Production may refer to the entire database. By leveraging deployment rules, users in Pre-Production stages can test and create reports faster, without having to bolster the full production data load. Set rules to ensure that Production data is always connected and available, so end users can always access the reports. Another best practice is to use parameters to store connection details instead of having static connection strings. This practice safeguards your workspaces from connection details changing without notice and causing errors and downtime for users.
To configure deployment rules, select the lightning bolt icon in the top right corner of the deployment stage and click Deployment Settings.
Select Data Source rule or Parameter rule and configure the settings accordingly.
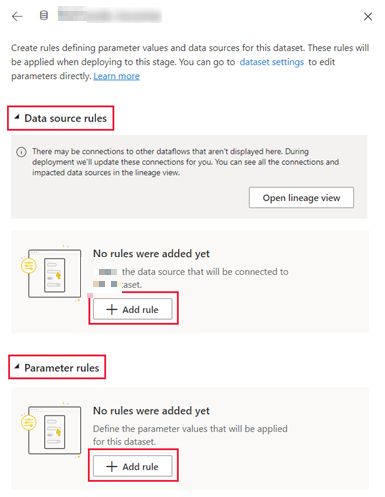
Note that you can only make rules for Dataflows, Datasets, and Paginated Reports. Additionally, before creating a rule, you must be the owner of the item. You cannot create rules in the Development stage, only in Production or Test. Further, when an item is deleted, its rules are also deleted, so be cautious when cleaning up pipeline stages.
Comparing Stages
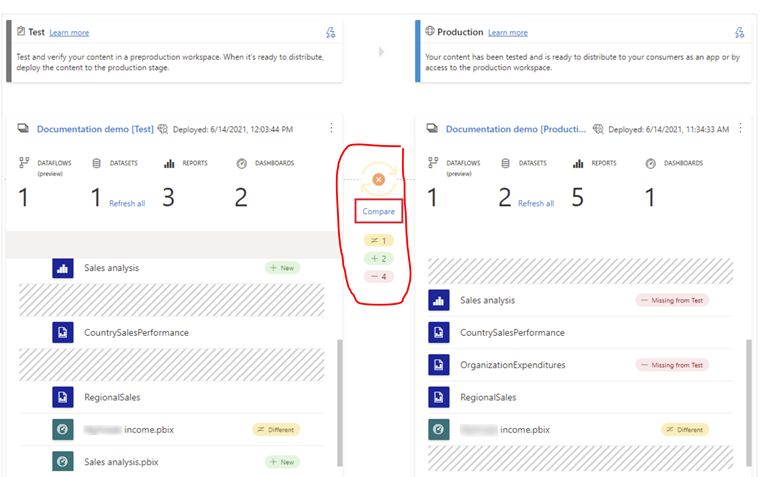
Deployment pipelines allow users to compare workspace stages with a single glance. Once you have multiple stages set up, you can compare the metadata of each workspace by reviewing the indicator icon that appears between the two stages. If the two stages are not identical, a Compare link appears under the orange icon – click “Compare” to track the individual item differences. The service notes which items are missing between the stages, which stages are new, and which stages have different features.
Permissions
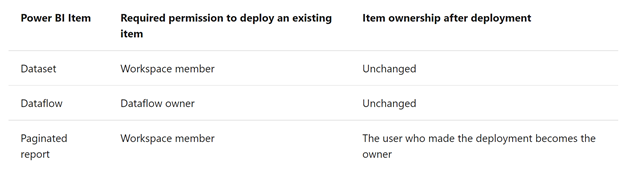
You must be an admin of the workspace to assign the workspace to a pipeline. You must also set up membership access individually for each environment. When deploying content to the next stage, workspace access from one stage does not carry over to the other stage. Therefore, it is best to plan permissions in advance. After you deploy items, ownership only changes for Paginated Reports:
Automating Deployment Pipelines
Users can automate aspects of deployment pipelines to streamline the deployment process and ensure continuous integration and continuous delivery (CI/CD) of content. Users can use Power BI REST APIs to integrate the pipeline with external services, such as Azure DevOps or GitHub Actions. By leveraging the REST APIs, users can accomplish tasks such as scheduling automatic deployments, deploying numerous pipelines at the same time, and assigning or unassigning users to the pipeline. With REST APIs, users can automate the entire lifecycle of a pipeline, from assigning workspaces to stages, to deploying or deleting the pipeline. Further, users can schedule deployments according to whether items are dependent between pipelines. With the help of REST APIs, deployment pipelines can become a nearly hands-off solution to content delivery.
In Conclusion
By leveraging Power BI’s deployment pipelines, users are empowered to monitor the status of their organizational content. With a mere glance, users can compare content between development stages and address potential discrepancies with ease. Deployment pipelines foster communication across different teams and environments, allowing organizations to connect and forge an efficient BI environment. Developers can set up parameters to protect sensitive data and ensure security is maintained, while still reaping the benefits of collaboration across the pipeline stages. By using deployment pipelines, users gain valuable time to insight to generate complex analyses from their data.
3Cloud has strong experience using Power BI deployment pipelines to create a more efficient Microsoft Azure ecosystem. If you’re wondering how this tool could benefit your business outcomes, contact us today!
3Cloud offers a variety of resources to help you learn how you can leverage Modern Data Platform capabilities.